Dear Reader,
This post aims to explain step by step process to setup your account of expense manager web application, and how you would make most out of it.
--------------------------------Before you further start please note following.-------------------------------------
- This is free to use website currently hosted on Microsoft Azure could. Service are free for any individual with no usage restriction. However to control misuse of service, availability shall be limit if threshold is reached for any individual/all.
- It is not commercial project and there is no monetary benefit from the website.
- DO NOT post any sensitive information in Expense manager website or anywhere in the web to stay safe online.
-------------------------------------------------------------------------------------------------------------------------------
STEP 1. Open Expense Manager Web application first. Click on register link available.
STEP 2. Enter your EmailID, configure strong password and repeat password(DON'T Enter your Email password). Refer screen as below.
STEP 3. Upon Successful registration and Login, you now have full access to features of the application. If you just click the options available you would not see any data for you as there is no data for you. You would probably see the pages as below.
If you see above screens there are informations provided, you need to follow screen instructions you can setup needed controls.
However if you are not able to understand onscreen instructions please keep reading the below details.
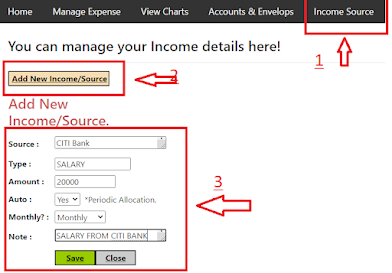
STEP4. Head first to setup your income setup. And click "Add new Income/Source" button and fill the informations needed as below and Save it.
a. You have option to setup auto posting of source of income by selecting the AUTO as YES and Select the posting period accordingly. System will do the posting automatically as per the period defined.
b. For one time income select AUTO as NO.
Upon successful save, system will make 2 entry if auto posting was select as YES else only second entry if it was supposed to be one time thing.
STEP 5. Once income setup complete head to Account/Envelops sections and Add ENVELOPS and Allocate budgets you would want to spend monthly/Yearly on specific section of Envelop/Budget Pocket.
Click Add New Envelop
Save the envelops and create more as per your requirement as below.
Similarly Add Accounts from where you usual do your transaction or in simple word from where you pay the bills or buy things, refer below for more details.
STEP 6. Once your income/account/Envelops are setup, now you are ready to move ahead for the Expense manage page where you would be able to add/view/edit and see the budgets. Click on Manage Expense and start adding your everyday transactions.
1. Click on Manage Expense(1) to land on the page. Read out highlighted numbers descriptions as below.
2. Envelop added and it's budget for the month it show.
3. You are viewing the Envelops list
4. Click View account to see the list of accounts added.
5. Show the current available budget to expenditure, i.e. currency there is 2000 INR or any currency left for you to spend.
6. It shows if you make any entry for the expenditure.
7. Click add expense to add a expenditure under the envelop and account.
Refer below screen for the test transaction entries made over the period of time.
STEP 7. Upon your entries, system will curate your data and show you the charts so that you can see the flow of money and expenditure and plan your expenses accordingly. Here are charts your can see under VIEW Charts pages.
1. Income VS Expense:- Year wise chart and total each year income and expenses as below.
2. Envelop wise Expenses
3. Month Wise Expenses
4. Payee VS Expenses
5. Budget VS Expenses
6. Payees Expense Trend. (Monthly/Yearly)


